Assessing Accessibility in Video Conferencing
Video conferences have always been around, but they have become really important in the last few years. Click here to learn how to access accessibility within them!

Video conferences have always been around, but they became important to our work culture with the introduction of COVID-19. In addition, with the increase of remote and hybrid work positions, we use virtual gatherings more than ever.
For Deaf and hard-of-hearing employees and business owners, navigating the accessibility features of different options is time-consuming. Each platform has its settings to explore, some more complex than others. With this accessibility guide, we will help you find the exact accommodations you need as a d/Deaf user or meeting host.
Zoom
Zoom is one of the most popular meeting platforms, with over 300 million users daily. Many find Zoom to be accessible, once you know how to interact with its many features. Zoom can customize its offerings to fit your needs, earning it a WCAG 2.1 AA compliance rating for accessibility.
Live Auto-captioning
Captioning during meetings is a game changer for many Deaf workers. Recent updates allow for auto-captioning in both free and paid Zoom accounts. Unfortunately, only the meeting hosts can enable caption settings, not the user. One other disadvantage is that other participants are alerted when it’s turned on. (Side note: It is worthwhile advocating Zoom for this to be changed as an automatic opt-in, and for privacy to be maintained.)
To enable captions it’s recommended for the host to log into your account from a web browser instead of the app.
- Click on “settings”.
- Click on “In meetings (advanced)”.
- Toggle “on” for each feature:
- Automated Captions
- Full Transcript
- Save Captions
Once enabled, the user only needs to click “show captions” as seen in the screenshot below:

What many participants do not realize is that you can customize the caption design and size, and even drag the captions around where you want to view them. I often move it next to the ASL interpreter so I can see two information feeds at the same time, and it helps me check the quality of the interpreter voicing me.
To update the caption appearance on your screen, log into your Zoom app as a user, click on settings, then accessibility. You will then see this screen:
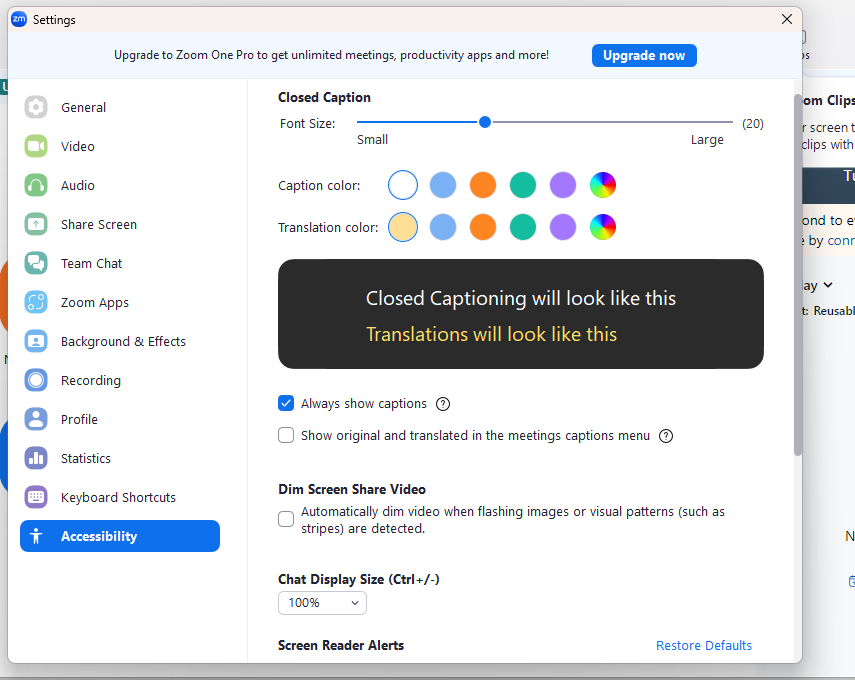
Here you can adjust the font size on the sliding bar, and change the colors. Be sure to check “Always show captions” there also, then you don’t have to remember to turn it on.
If you are DeafBlind and use a screen reader, there are Screen Reader Alerts settings at the bottom of this page also.
Bonus Tip: Did you know you can download captions as a full transcript after a meeting? If the host has this enabled, follow the following steps:
- Join your meeting.
- In your meeting controls, click Closed Caption
- Click on the following:
- Windows/macOS: View Full Transcript.
- Linux: Show Subtitle.
- In the Transcript window, click Save Transcript.
- Click Show in Folder or Finder to access your saved captions.
CART Integration

What if you need the accuracy of a real-time transcription over auto-captioning? Some users prefer to have Communication Access Realtime Transcription (CART) which is a third-party service doing the transcription in a live feed.
The host will need to assign a participant to do the transcription within the meeting or use an API Token to give a third-party captioning service access to the meeting.
To assign a participant to do the captioning follow the steps on the Managing Manual Captioning from Zoom support.
To use an API Token for a third-party captioner, follow the steps on Using A Third Party Closed Captioning Service from Zoom support.
Sign Language Interpreter Integration
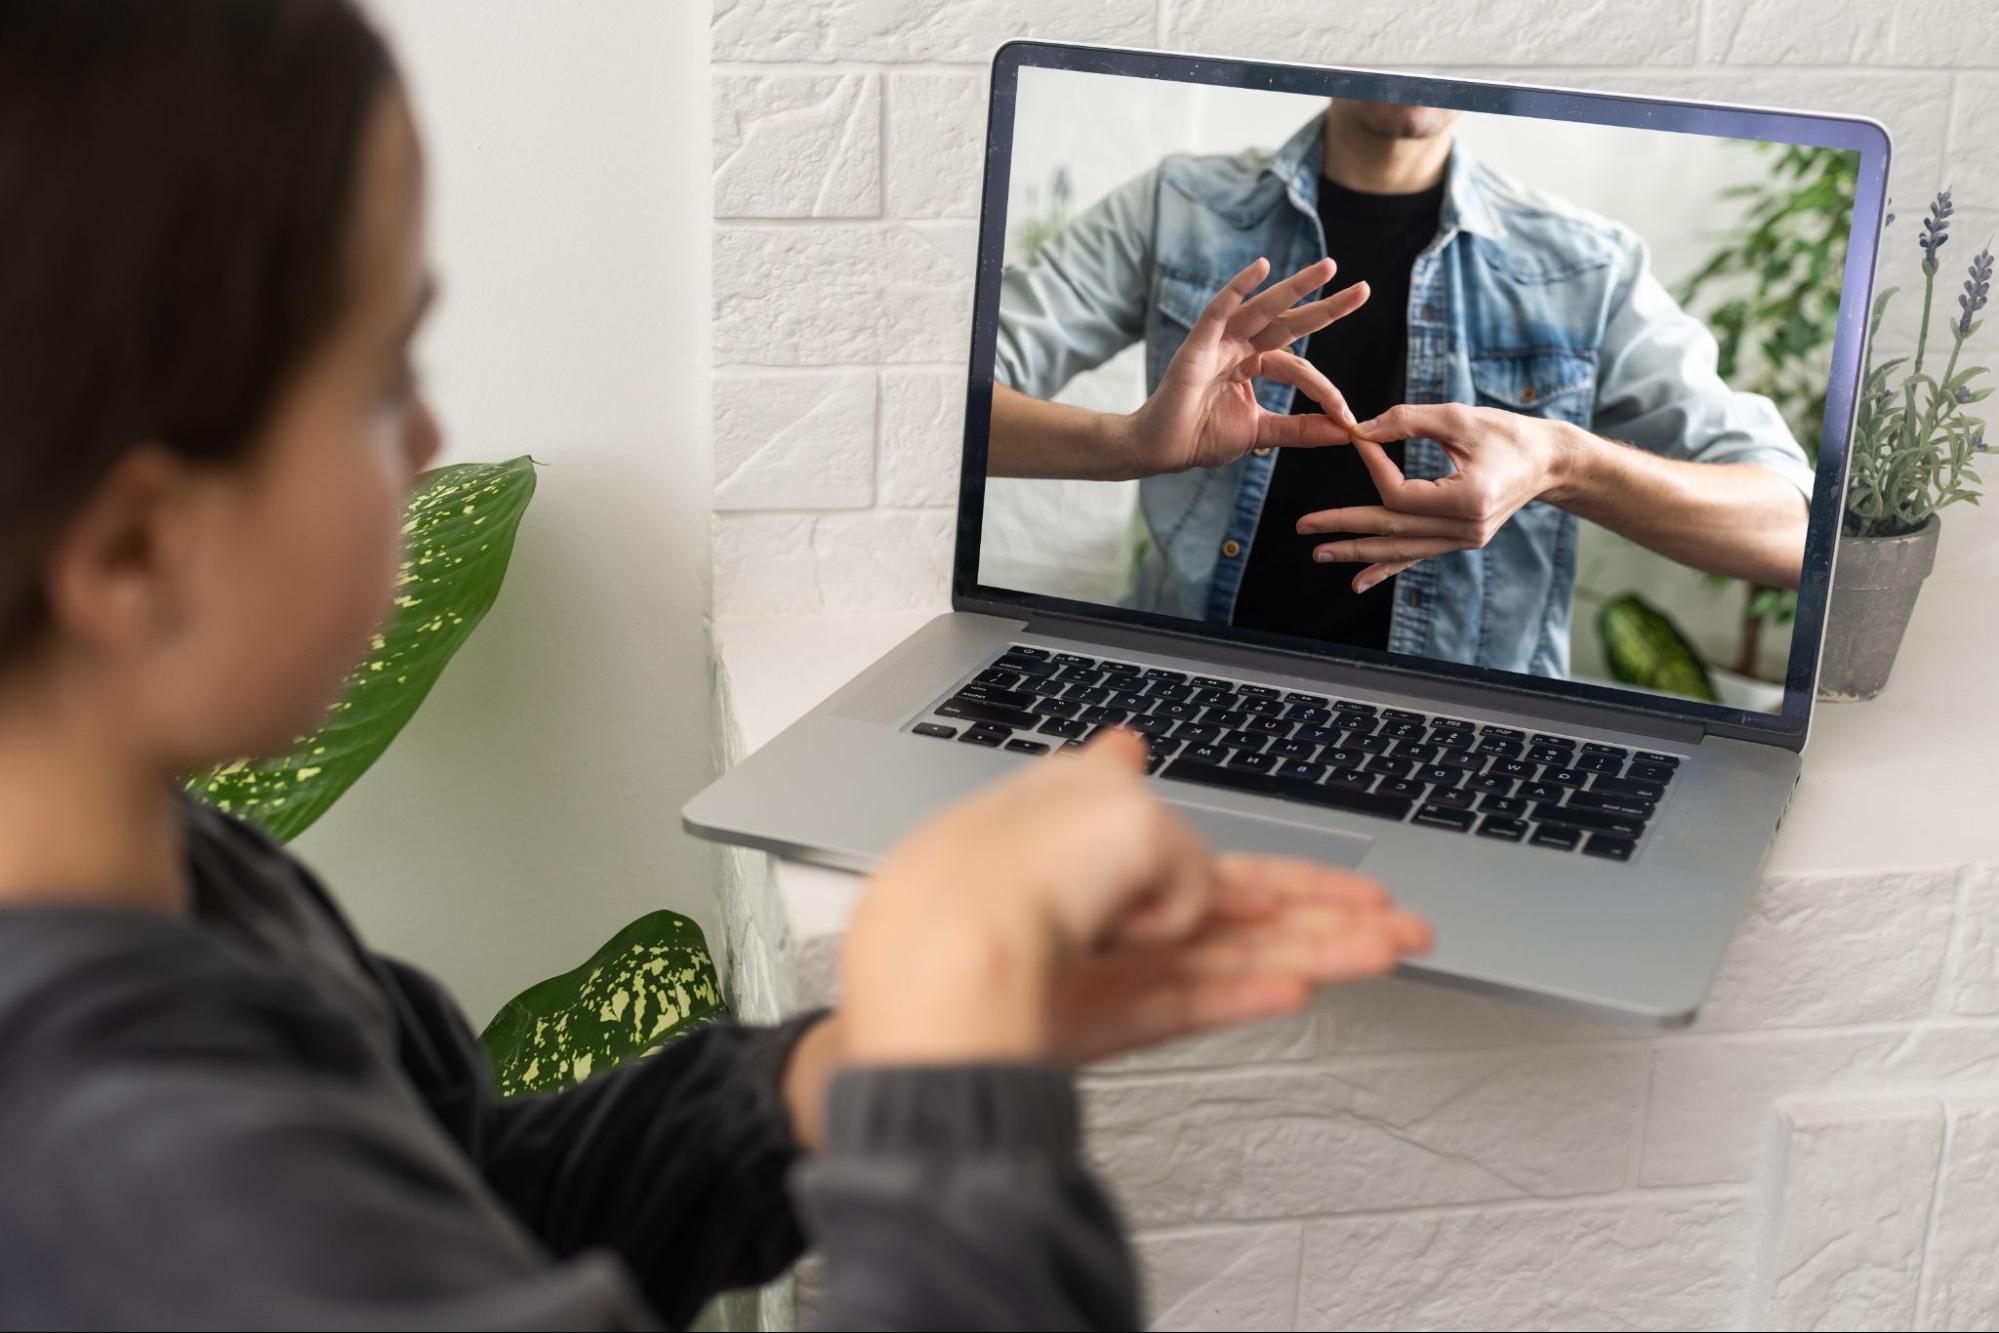
For the Deaf who prefer to have Interpreters present during meetings, there are a few ways to incorporate them for the best viewing experience.
Option 1 (host): Use the spotlight feature. First, enable active speaker view, instead of gallery default. The host can use the three dots at the upper right corner of the interpreter’s video and click “Spotlight Video” or “Spotlight Video for Everyone”.
This way both the speaker and interpreter can appear side by side.
Option 1 (participant): Pin the interpreter video. As a user, you can pin a video you want to see the most. Users can only pin one video at a time, while a host can pin up to 9 speakers in total. The host can also enable users to have access to the multi-pin feature, so it may be worthwhile asking for that as a participant.
To pin a video, hover your mouse over the speaker video, click on the three dots in the corner, and then “pin”. If you have a dual monitor enabled in your settings, you can pin it to a second screen, freeing up space for the meeting view. This is a great feature for when screen sharing occurs, as the gallery view becomes minimized and makes it very hard to see an interpreter.
Click on Pinning Participants’ Videos from Zoom support for all the ways this feature can be used.
One disadvantage of pinning is that the other speakers and participants are hidden from view in some cases.
Option 2 (host): Enabling Sign Language Interpreter View in settings. This feature allows the interpreters to always be in view in the meetings. The participant can move the video around, resize it, and use a resizer. It also allows the interpreter to join the meeting straight away, and skip the waiting room.
However, there are some significant disadvantages to this option that both host and user should be aware of. One is that the interpreters' voice setting is defaulted to off at all times. Should the interpreter need to voice for a Deaf user, the host will have to enable it during the meeting. This can be done at the beginning of the meeting to save time.
Secondly, interpreter views are excluded from the cloud recording, if the meeting is recorded. If you have the goal of rewatching the meeting later or sharing it, the interpreter will not be in it for the Deaf viewer.
Third, in team interpreting situations the first interpreter listed is the default interpreter. Switching to a second interpreter is not seamless and takes some prior communication and coordination.
For more ins and outs of this feature see Using Sign Language Interpretation in Meetings from Zoom support.
Option 3 (host): Set up the Interpreter as a Co-host. Zoom support covers how to Enable and Add A Co-host. Being a co-host will give the interpreter access to different controls like the ability to manage Deaf participants' videos and access. It may be more control than the host is comfortable with giving, however.
Bonus tip: ✋🏼✋🏾✋🏿
Did you know that you can use the “reaction button” (red highlight below) at the bottom of the zoom screen to raise your hand for a turn to speak? This helps the host and the interpreter know that you want to sign or voice.

Microsoft Teams
Another popular video conferencing is Microsoft Teams – with 300 million users as of 2023. Like Zoom, Teams has accessibility features you can enable. Let us look at a few that d/Deaf users may find to be of interest.
Live Auto-Captioning
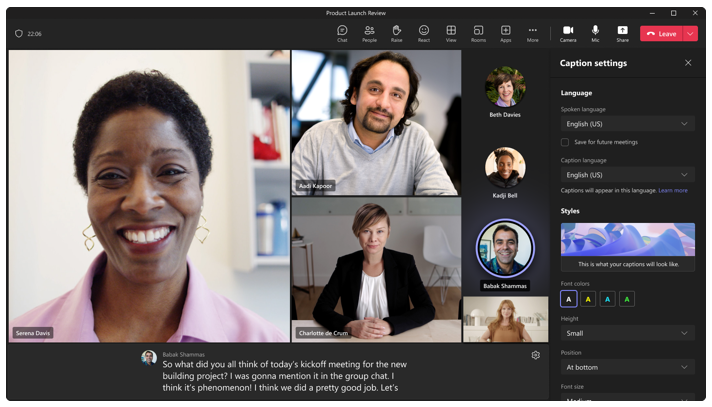
One great feature of Teams captioning, is speaker recognition. Captions will be associated with the speaker’s profile picture for ease of identification as seen in the above image.
To enable auto-captioning To use live captions in a meeting, go to your meeting controls at the top of the screen and select More ***> Language and speech > Turn on live captions.
One interesting feature is the ability to change the captioning language to a different one than the spoken language. The default is for the caption language to match spoken, but this can be changed in settings allowing for live language translation — this is only available in Teams Premium accounts, however.
To adjust caption settings, to the right of the captions box at the bottom of the Teams screen click the settings icon ⚙️.
Then select Caption Settings, and adjust to your preferences.
🛑Important Note: Captions cannot be saved after meetings like in Zoom. To save a transcript, you will need to enable the transcription feature. To set up a live transcript that can be viewed during the meeting and downloaded afterward, click View Live Transcription in Microsoft Teams Meeting to learn how to set up the various features. You can also edit a transcript for accuracy as well.
CART Integration
The host of the meeting can set up real-time captioning for Teams meetings, by setting up a separate link beforehand for the third-party service. One unique feature is that the user can toggle between the auto-captioning or CART if they choose.
To set up CART, the meeting organizer needs to do the following steps:
- Create and send the meeting invitation as usual. Remember to invite the CART captioner to the meeting.
- Open the meeting invite you created.
- Select Meeting options.
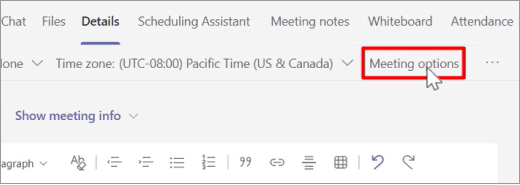
- On the Meeting options page, turn on the Provide CART Captions switch, and then select Save to create the CART caption link.
- Under Provide CART Captions, a link appears. To copy the link, select Copy link. The link is copied to the clipboard.

- Paste the link to an email message and send it to the CART captioner to enter into their captioning software.
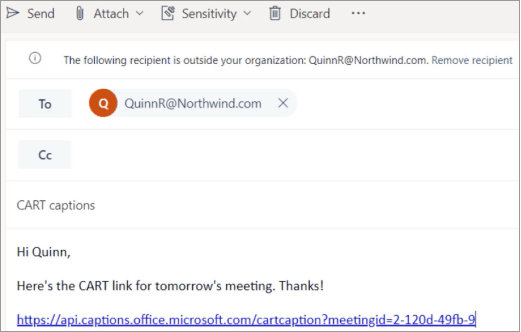
- Connect with the CART captioner before the meeting to make sure everything is set up correctly.
The above steps and images are excerpted from Use CART captions in a Microsoft Teams Meeting; click through to see more features, how to turn CART on/off, and how to set up Microsoft Teams API for CART.
Sign Language Interpreter Integration
As a Deaf user you can pin an important video regardless of speaker. To pin an interpreter video, right-click over their video, and click “pin”. This will change your view of the meeting, but not affect anyone else’s layout.
As a meeting organizer, you can set up a Sign Language View as a default setting for users who need it. To enable Sign Language View across all your meetings by default, in Microsoft Teams, select (Settings and more) > Settings > Accessibility, and then turn on Sign Language. For more information, on Sign Language View and its features see Use Sign Language View in Microsoft Teams.
Another option is to use the spotlight feature to pin the interpreter with other speakers. You can spotlight up to seven people in Microsoft Teams. To enable Spotlight follow the steps listed on Spotlight Someone’s Video In Microsoft Teams Meetings.
Bonus Tip: 💻
If there is screen sharing, documents, or slides during Teams meeting, as a user you can move the meeting to a new window to keep access to videos. To enable meetings to open in separate windows, go to Settings > General, and make sure that the Turn on new meeting experience setting is enabled.
Google Meet
With over 100 million users a day on average, Google Meet is another virtual meeting option and is considered to be one of the most user-friendly platforms. Read on to see why.
Live Auto-Captioning
Captions are automatically enabled for Google Meet. To turn on or off, you only need to click on the CC button at the bottom of your meeting screen. The ability to have translated captions in other languages is only available on the higher-tier paid accounts.
It is important to note that if you record the meeting, you need to take an extra step to have that embedded into the recording. To learn how to turn that on, or enable language translation see Use Captions & Translated Captions in Google Meet.
CART Integration
Unfortunately, there is no integration for manual captioning in Google Meet. Nor is there a third-party app or extension to work around it at this time.
There is an option to have a transcription during the meeting and save it for paid accounts. To turn on transcription follow the steps below:
- On your computer, join or start a meeting in Google Meet.
- At the bottom right, click Activities > Transcripts > Start Transcription > Start.
Sign Language Interpreter Integration
There isn’t a direct way to integrate a sign language interpreter at this time. One way around it is the Pair Tiles feature. You can pair a video “tile” with yourself to keep it in view at all times. A downside is this request can be denied by the other person. It is also only available in desktop mode.
To pair a tile complete the following steps:
- In a meeting, open the participants list.
- In the participants list, find the person you’d like to be paired with.
- Next to their name, click Menu > Ask to pair your tiles.
For more information see Pair Tiles in Google Meet.
A second option is to use the Pinning feature. To pin, you hover over the tile and click on the pin icon. Either host or participant can pin, and you can decide if it’s for your view only or everyone in the meeting. For more on pinning, see Pin or Mute Google Meet Participants.
Bonus Tip: ✋🏼✋🏾✋🏿
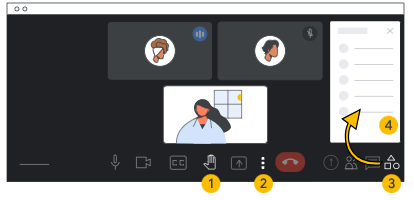
At the bottom of the Google Meet screen there is a “raised hand” icon to indicate that you want to say something. See #1 in the image below (image credit Google Meet support).
Skype
My research does not show many accessibility features for this platform. Most of the options are for screen readers and high-contrast mode. There’s also a magnification setting for low-vision users.
For more information on their accessibility options see What accessibility features are available for Skype? While a sign language interpreter can join a Skype meeting, there are no captions or integration for a CART service. In addition, it cannot give the user the ability to move videos around or pin one for viewing ease. For the d/Deaf user, it may be better to use other platforms for accessible support in virtual meetings.
Slack Huddles
Many workplaces around the world use Slack for office communication. I have found it to be user-friendly since it’s heavily text-based. However, it does have the option to do a virtual “huddle” on the fly to communicate with a colleague or a group of people.
Huddles can be set up to have auto-captions for d/Deaf users. You can set up your preferences in your profile so that it will come up automatically each time. See Adjust your huddle preferences for the steps on setting it up.
Huddles are limited in accessibility features since it’s meant for a quick face-to-face chat.
Additional Accessibility Tips
Provide slides and materials in advance.
Participants, interpreters, and transcribers will benefit if you’re able to email or let them preview the material before the meeting. This will let the interpreters and transcribers become familiar with the content for better understanding and accuracy during the meeting.
Communicate directly.
Whether you are the host or the participant communicating with each other will improve the experience. As the host, ask the d/Deaf user what they need and what their preferences are. If you are the participant, learn what features are available to you and ask the host to enable them in advance of your meeting. Including links to a guide such as this one will be helpful for the host to set it up easily.
Set up accommodations in advance.
Whether you need sign language interpreters or CART transcribers, contact the appropriate agencies to secure accommodations early. Service providers get booked quickly, and it’s a good policy to start looking at least 1-2 weeks before you need a service.
Test out the features early.
Take your time to comb through the settings and learn which areas need to be enabled for accessibility. Run a test meeting with a volunteer to ensure everything is working properly. Some platforms have test links you can use to check without a volunteer. Here are the test links for different platforms:
The Future of Virtual Accessibility

Regardless of your video meeting platform preferences, we’re in an exciting era and seeing new features and options being rolled out every day. I can remember a time when I had to dial the Zoom phone number through a relay service and read the transcription on a TTY phone while watching the meeting on the computer on the side. That was incredibly awkward and with a large amount of lag time. To have an interpreter on the same screen with auto-captions is a huge improvement for d/Deaf users.
As technology advances, I see it improving with more customization and options available. Maybe one day captions will auto-translate into other languages. Perhaps we’ll have interpreting on demand in sign language. I dream of a custom profile that one can set up, and settings will update based on your needs–wouldn’t that be amazing? Time will tell what technology can bring us.
Here’s to a more inclusive and connected world for us all!


